This blog will be discontinued as I am focusing on learning Swift now.
Monday, April 20, 2015
Friday, April 5, 2013
How to create and display a "list" of items (using Table View)
Creating a simple Table View
- Open the storyboard, from the right panel, drag a Table View control onto the story board.

- Open ViewController.h and add the highlighted text:
@interface XViewController : UIViewController <UITableViewDelegate, UITableViewDataSource>
@end - Open ViewController.m and insert the following line in between the @implementation section:
NSArray *tableData; - Add the following code in the viewDidLoad function:
tableData = [NSArray arrayWithObjects:@"Item 1", @"Item 2", @"Item 3", @"Item4", nil]; - Add the following 2 functions as well:- (NSInteger)tableView:(UITableView *)tableView numberOfRowsInSection:(NSInteger)section{return [tableData count];}- (UITableViewCell *)tableView:(UITableView *)tableView cellForRowAtIndexPath:(NSIndexPath *)indexPath{static NSString *simpleTableIdentifier = @"SimpleTableItem";UITableViewCell *cell = [tableView dequeueReusableCellWithIdentifier:simpleTableIdentifier];if (cell == nil) {cell = [[UITableViewCell alloc] initWithStyle:UITableViewCellStyleDefault reuseIdentifier:simpleTableIdentifier];}cell.textLabel.text = [tableData objectAtIndex:indexPath.row];return cell;}
- Open storyboard
- Right click drag from the TableView control to the yellow icon and release. Choose dataSource.


- Done. Run the app:


Adding an icon next to each list item
- Click the menu item, File > Add files to "your project".
- Choose a file for the icon:

- In the ViewController.m file, in the function cellForRowAtIndexPath, paste the following line at the indicated location:
 cell.imageView.image = [UIImage imageNamed:@"AddedImage.jpg"];
 - Run the project.


Friday, March 29, 2013
How to display current location on the Map (using the iOS Simulator)
If this is the first time that you are using the iOS Simulator to display a map, chances are that the simulator still needs to be setup with an initial location/position. To do that follow these steps:
- First get your current location, go to http://maps.google.com
- Click the link icon and grab the co-ordinates:

- In the iOS Simulator, click the menu links Debug > Location > Custom Location...

- Enter the co-ordinates, and click OK.

- The map in your application should now be showing the blip icon (the blue current position icon) in the custom location that you just specified. Thats it.
For future applications the iOS Simulator remembers this location.
- One more point to remember, when you had dragged the Map View control onto the story board, at that time you should setup the properties of the Map View and ensure that Show User Location checkbox is checked, as shown below:


Wednesday, March 27, 2013
How to display a Map
- Create a new project, choose Single View Application.
- On the initial preferences/setup screen (or click the file projectname.xcodeproj) a list of linked frameworks is shown:

- Click the + button to add a new framework.

- Search for mapkit and add it.

- Open the story board.
- From the right side panel, drag the Map View control onto the story board.

- Done. Run the application it should look like this:


Monday, March 25, 2013
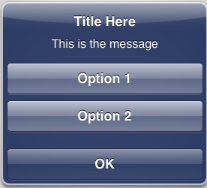
How to display multiple buttons/options on a popup message
- Open the ViewController.h file and paste the following code to declare the event handler within the @interface section:
- Open the ViewController.m file and paste the following code to trigger the dialog:UIAlertView *alert = [[UIAlertView alloc] initWithTitle:@"Title Here" message:@"This is the message" delegate:self cancelButtonTitle:@"OK" otherButtonTitles:nil];[alert setTag:12];[alert addButtonWithTitle:@"Option 1"];[alert addButtonWithTitle:@"Option 2"];[alert show];
- Paste the following code to implement the event handler within the @implementation section:- (void)alertView:(UIAlertView *)alertView didDismissWithButtonIndex:(NSInteger)buttonIndex{if ([alertView tag] == 12){if (buttonIndex == 0){UIAlertView *alert = [[UIAlertView alloc] initWithTitle:@"Response" message:@"You chose the default button (which is Cancel in this case)" delegate:self cancelButtonTitle:@"OK" otherButtonTitles:nil];[alert show];}else if (buttonIndex == 1){UIAlertView *alert = [[UIAlertView alloc] initWithTitle:@"Response" message:@"You selected Option 1" delegate:self cancelButtonTitle:@"OK" otherButtonTitles:nil];[alert show];}else if (buttonIndex == 2){UIAlertView *alert = [[UIAlertView alloc] initWithTitle:@"Response" message:@"You selected Option 2" delegate:self cancelButtonTitle:@"OK" otherButtonTitles:nil];[alert show];}}}
- Done. Lets run it:
When you click the Option 1 button, you get:
- (void)alertView:(UIAlertView *)alertView didDismissWithButtonIndex:(NSInteger)buttonIndex;
Friday, March 22, 2013
How to display a message/popup
- Write the following code in the ViewController.m file:UIAlertView *alert = [[UIAlertView alloc] initWithTitle:@"Title Here" message:@"This is the message" delegate:self cancelButtonTitle:@"OK" otherButtonTitles:nil];[alert show];
- Run the code, it should display like:

Wednesday, March 20, 2013
How to add multiple tabs (more than 2 default tabs)
- Project > New
- Choose Tabbed Application.
- It starts up with 2 tabs initially.
- Open the story board.
- From the right side panel which contains objects/controls, drag the View Controller onto the story board.

- Now right click-drag from the root tab bar and drop it to the newly added view controller.

- A popup will appear, select the last choice labelled as view controllers.

- Done. Now you have 3 tabs.
Subscribe to:
Posts (Atom)